Tuesday, September 29, 2009

Chandelier For The Seasons

Now that my kitchen is close to being finished, I finally finished my chandelier! I got this brass chandelier off of Craigslist for $30.00 last year. I realize now that I overpaid, because I've since seen this type in thrift stores for $10!

Anyway here is a blurry photo of the chandelier. Excuse the mess, our one garage is completely disorganized-especially since we're remodeling. All the tools and old doors and whatnots end up in here. I wish I would have taken a better photo, but I totally forgot until it was ready to be spray painted. So here it is, ready to be painted.
I lightly sanded it and used baby wipes to wipe off any excess dust and fingerprints.
I primed it and then painted it white. I actually painted it off-white, and then after it was hung in the kitchen it looked bad! Because the walls are white, it made the chandelier look yellowish. So I took it back out to the garage for another round of spray paint! So here it is finished and white!

After it was hung, I had a wonderful idea to take the candle cover parts that cover the wires and mod podge seasonal scrapbook paper onto them! I figured I could change them out each season and it would add to the decor!
You can buy the candle cover things at Lowe's. They are super inexpensive, a pack of two is about a dollar or two! Here is what I did:
First, I layed the candle cover thingy (my technical term) on the edge of a sheet of 12x12 scrapbook paper. I measured it's height, and then took my paper cuter and cut a long strip off.

Next, I layed the candle cover thingy onto the long strip and rolled it until it was completely covered and marked the paper so I knew where to cut. I then cut the paper and adhered it around the candle cover thingy using permanent scrapbook adhesive. You could use Mod Podge, but I wanted to finish this project quickly. If your measurements are a little off and the paper is sticking above the candle cover thingy, you could use sandpaper to sand it off before using the Mod Podge. I sanded the first time that I made these, and then discovered it's easier to just use scissors and trim of the edges!
Finally, I put a nice layer of modge podge on the candle cover thingy and left it dry! It was then ready to slip onto my chandelier! Here is a closeup of my chandelier decorated for Halloween, using candy corn scrapbook paper!
My kitchen is pink, so here is the everyday look.
The possibilities are endless! Think of the fun you can have decorating it for Christmas, Valentine's Day, Easter and Oooh the Fourth of July!

Go on over to "A Soft Place to Land" and see more DIY projects!
DIY Day @ ASPTL

Thursday, September 24, 2009

Thrift Store Frame Transformation

It has been a really busy week for me! I've been trying to get the house back together....we're nearing the end of our 3-year plus remodel! YAY!

Besides reorganizing and cleaning, I've been doing a couple of projects. I finished my headboard & footboard. I've redone a chandelier, and finished 9 frames for my massive photo wall! I will share those projects with you throughout the week, so keep checking back!

Here is a thrift store frame transformation! I bought two of these frames at Goodwill for $1.50 each! I wish I had taken a photo with what was inside (it was a very ugly bird photo). Anyway, when I found two identical frames of this size....I fell in love! And I knew exactly what I was going to do with them. They were the perfect size for a little handprint!

These frames were plastic....but I primed and painted them with regular spray paint and it worked out really well! Here is a before photo of the frame.
And here is an after with Alexander's handprint. My kitchen is aqua and pink...so I decided to do the frames in an aqua color. I used Krylon's "blue ocean breeze."
And here is Benjamin's handprint.
And here is the what they look like on either side of my kitchen window! They are soo adorable, and much cuter in person!
So the total of the frames were $3.00 and I barely used any paint and primer (which I had on hand). And I used acrylic paint, which I had as well, for the handprints. So for under $5.00 I have these wonderful little handprints for on the wall!
Be sure to check back this week for some other cool projects!
Also, be sure to visit Katie at "Along the Way with K & J" for a Trash to Treasure Party! Love her blog, and everyone has such wonderful ideas and finds! I added my link...now go and add yours too! :)

Also, go to "Shades Of Pink" for a wonderful Shade Tutorial and a Linky Party!


Saturday, September 12, 2009

The Flax Scutching Festival

Today we went to the Flax Scutching Festival! You are probably wondering what "Flax Scutching" is. Well, you can read about it here! Basically it's the art of making linen from the flax plant.

They have demonstrations going all day showing you the process! The process used at the Stahlstown Flax Scutching Festival in Stahlstown PA, was the process used by our ancestors in the New World and the Old World. (1) the harvesting and drying process (2) The peeling of the stalks and separation of the fibers (3) the hackling and (4) the weaving of the cloth! It's quite interesting!

Today though we were all under the weather. The boys have had a bad cold for a few days, and Chris was feeling achy and feverish. I was also not feeling my usual self, but we wanted to go to the festival anyway! This seemed to be the first year that we were actually home and could attend! This festival runs two days and usually we are away from home!

Today it was on the cooler side, and at times there was a fine mist of rain! But we had a great time despite the weather!

We really came to the festival for two things (1) the staged Indian Raid & (2) a hay ride!

Here are the boys in their wagon ready for the Indian Raid Reenactment! Ben of course had to have ear muffs on because he absolutely hates loud noises! They were firing cannons and in the reenactment they were firing guns (with blanks of course)! The only time I could get him to take these off was for the hayride! lol

Here are the Indians getting ready to raid the settler's home!
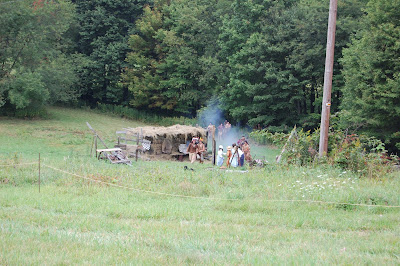
The Indians set the settler's place on fire! It was quite dramatic! Ben was afraid that the fire was going to get out of control and spread toward us!
I have very fond memories going to this festival and seeing the reenactment! And now my boys will have fond memories too!

Here is a booth where they are making and selling buckwheat hulls, corn meal, and whole wheat flour! The machines behind the bags are what is making the product! I really like whenever the booths show you how the things are made!
There were many antique tractors at this festival! The boys loved seeing them all! Here is a closeup of one!
Oh my, this was my favorite booth! It was a booth that sold honey! I don't particularly care for honey...I can eat it, but it's not something I crave. Anyway, what I do like are bees! This display had the bees in between plexiglass, and you can see them at work making honey!
Here is a closeup of the bees! Sometimes, I'm not too intelligent, I don't think before I speak! Out of all these bees, I asked the guy..."Do you know which one the queen is?" That's right....I did ask that stupid question! lol He probably thought I was crazy!

These bees were put in this display about a week ago, and look how much work they've done already! They are just amazing! There were even bees on the outside trying to get in!
I have always been fascinated with bees, so I signed up for a class that will be held in February to teach you about becoming a "bee keeper!" I would really like to raise bees....I'm currently trying to talk my husband into it!

Now, how cool is this guy? I secretly wish I could express myself and dress eccentrically! But I just can't! I'm always too worried about what people think! This man plays guitar and sings for kids! He's quite entertaining! Don't you just love his "Hee Haw" overalls?!!!!! You all remember "Hee Haw" don't you?
Here are the boys before the hay ride!


Alexander has always been fascinated with farms and tractors! As soon as he got on the wagon, he was touching the hay!
We were quite proud of Alex...he's usually afraid of rides of any kind. He's afraid of the Power Wheels, quads, and even kiddie rides at the amusement park! This was a big step for him!

At first, he thought when the tractor started it would be loud! But it wasn't!
Here we are enjoying the hay ride! It was quite bumpy!
As we were walking to our car we saw other people enjoying their hayride!
And I just love this photo...it's Alex saying goodbye to the farmer and his tractor!
Despite being sick, we really had a fun day! Cannot wait until next year!

Wednesday, September 9, 2009

The Time Capsule

A few weeks ago, my husband finally finished putting up our new kitchen cabinets that we bought on craigslist! They were only 5 or 6 years old and in perfect condition!

Today they finally came and installed our kitchen countertops! I'm soo excited, I can barely handle myself! Tomorrow I'm going to start decorating the kitchen for Halloween!

Back in February my blogger friend Kristin blogged about about a time capsule that her mother had placed in her kitchen! You can read about it here! I thought it was such a great idea, but since we were almost done with our remodeling I wasn't sure where we were going to place it! Well, in the back corner of the kitchen behind the lazy susan is a gap of space...perfect for hiding my family's time capsule!

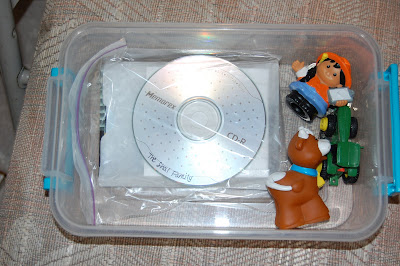
I placed many things inside the container such as a letter talking about the house's history, the boy's paintings, many photos, coins, toys, a c.d. with even more photos, and a newspaper from today! What made it more special is the date today is 9-9-09!

Here is an excerpt of my letter. As I wrote this I felt sad, as if I was giving away my house!
Here's a piece of what I wrote:

"What really makes this house special is that our two children were raised here! Benjamin Christopher Shal was born on July 31, 2005 and Alexander William Shal was born on December 12, 2006. Each of my boys had their first steps in this house, said their first words, and crawled all over every inch of floor! There were many giggles, many songs sang, and many prayers said! Each birthday and holiday was very special to our family! There was so much love in this house and hopefully you'll enjoy it as much as we did!"


Here are some photos that I placed inside! Since my boys are growing up in this house, I wanted to include photos of them beginning to walk, and swinging in the backyard! These are just a sampling of the photos that I included in my time capsule! There are many more photos, plus a c.d. of even many more photos! lol

Also in the middle of the photos you can see the coins that I included in there as well! I couldn't find any 2009 coins, so I came up with the idea to include a state quarter for each year that we lived in our house! From the year 2000 until 2008!
I also included today's daily newspaper.
Here's a closeup (Corlett style)!
What's a time capsule without kid's paintings and coloring pages!?
Here's a look at what I've included inside. I even put some of my boy's favorite toys when they were younger! They spent many hours playing with these toys!
See the gap in the back corner behind the lazy susan? This is where I placed the time capsule!
Here I am holding the time capsule before I put it in place!
I bet you never imagined seeing this side of me! lol My husband was documenting the process of the time capsule...I had to stretch and place it way down on the floor!
Here it is all lonely back there! I really could have hid something much bigger back there!
After I put everything in place the kitchen countertops were installed! I'll share those photos with you another day! Thank you Kristin for the wonderful idea of the time capsule!

Also in a few days I will blog about the interesting history of my house and share some of the cool things we've found since we've remodeled!

Have a great week!