Showing posts with label Crafts. Show all posts

Tuesday, May 24, 2011

A House For An Imaginary Friend

My son Benjamin has had an imaginary friend for the past couple of years. Can you guess who it may be? Sometimes I find him playing alone with "Jerry." They even play boardgames together! His friend Jerry is from the cartoon "Tom & Jerry!" I have no idea why Jerry has all of a sudden become his friend, but he has and I'm totally fine with that. Someone I know suggested that I don't play into this imaginary friend thing. But I find it harmless and have read that it probably means he's creative and imaginative.
 For awhile now I haven't heard anything about Jerry. But the other day while driving in the car, I noticed that Ben was very sad. Since I had just picked him up from school, I thought that something may have occurred there. So I asked him what was wrong. He said: "Jerry moved away with his family." And he said it with this sad sigh as he put his head against the seat. I asked him why Jerry couldn't move back in with us, and he said because Tom would probably chase him! lol I thought about it for awhile and then I came up with a solution.

I have a bin full of unfinished birdhouses in storage that I have never gotten around to painting. So I let Ben choose which house would be suitable for his friend and he came up with this one.

I really wanted to paint this myself with big funky polka dots and bright colors, but he only let me paint just a little bit. I guess I'll need to make my own mouse house! lol
 He was really drawn to the glittery paint.
 Here is his finished "mouse house." He was soo proud! According to Ben, Jerry's last name is "Mouse"...so I painted that on the doormat! Hopefully this house is big enough because Ben said there are 200 mice in Jerry's family! lol
 This photo cracks me up! lol He has that look on his face like he is thinking: "Come let me lure you into this mouse house with a trap...Muahahahahahaha!"
 Here is Ben's mouse house with a little plant that we added on the porch! It sits beside his bed so Jerry and his family of 200 can move back in with us! And all is well again! :)

Tuesday, January 11, 2011

Living a chaotic life!

Wow, it has been such a long time since I last blogged! I apologize, and I probably lost many readers, but December is one of the most chaotic months for me!

My photography business is finally picking up, Alex's birthday is on December 12th, and then there is Christmas! There's just a ton of stuff packed into one month! I know I'm behind, but I'd still like to share some photos from December! Here are some photos from Alex's 4th birthday party! As you can see it was "Lego" themed. I was so excited when I found this t-shirt, I thought it would be perfect for him to wear for his party!
 He's very excited that he is now 4!
 I haven't made a themed birthday cake in a few years, but this year I thought I'd try to tackle a Lego Brick cake.
 I made this yellow brick cake and the blue one that you can see behind it. I wasn't super happy with how it turned out, but the kids seemed to love it! I even used one of his little Lego characters to hold one of the candles!
 Here is the table centerpiece. I used a Lego gameboard that I found at a thrift store and a vase that I filled with Lego Bricks. The little boxes were filled with treats and I stamped each child's name on the box. I wish I would have gotten a photo with all the little Lego Man boxes, but the kids snatched them up pretty quickly! lol
 I made these gift bags for each child that were made to look like Lego Bricks. I purchased solid color gift bags and used a hole punch to punch out circles from cardstock and used dimensional stickers to add them to the front. Very inexpensive and very easy.
So that was basically his fourth birthday! He had a great time and got tons and tons of what else...LEGOS! :)

I plan to start updating my blog on a regular basis, just please stick with me. I've gone through a tough time in the last month and I'll share that with you soon. Hope you are staying warm in whatever part of the world you are in! Have a great week!

Wednesday, September 1, 2010

My Little Artist

Today we took a trip, outside of Pittsburgh, to pick up this little art desk that we found on Craigslist!

Alexander, my youngest son, absolutely LOVES creating! He is very imaginative and just loves to tell stories, paint, and color! I wanted to give him his own little creative space, and I always loved this desk made by Step 2. It has a place for all of his supplies and the top of his desk is a dry erase board that lifts up for additional storage!

Each side and the back of the desk has additional storage for his coloring books and tablets.
He spent the remainder of the day just being creative!
Here he is using the dry erase desktop! The best part was that this desk only cost $30 and it was in near perfect condition! There were no marks on it and it was super clean!
I think he is an awesome artist for only being three-years-old! Here is a picture he drew of me! He is drawing at the level of his older brother!

So while Ben is at school each day, this is probably where Alex will be spending his time! But that's ok, cause I like to be creative too!

Wednesday, August 18, 2010

Back To School Tree-Mini Tutorial

It is hard to believe that summer is almost over! My oldest son Ben starts Kindergarten this year and we're very excited! I wanted to celebrate this event, so I decorated a pencil tree in a "back to school" theme!
This will be my first mini tutorial. I guess it's not really a tutorial, but just some helpful tips to help you decorate your own back to school tree on a budget.

Here are some basic supplies. I forgot to take a photo of my ribbon. I used about two spools of ribbon. One that had polka dots, and the other, which is my favorite ribbon, looks like a ruler! Very cute for a back to school themed tree! :)

Besides ribbon, you'll need a box of chalk (12 count), 2 bags of mini chalkboard ornaments (found at Joann's), 2 rulers, and a white gel pen for writing on the mini chalkboards. You could also use white acrylic paint, but I found the gel pens are much easier to write with.

In the above photo notice the pink marks on the ruler. That is where my husband cut the ruler in three places. He cut right above the three ring binder holes. We cut it this way so we could skip the step of drilling a hole in the ruler to hang it from. This way is quicker and your ornament is ready to string with ribbon immediately!

In the photo below is the cut rulers, but really you only need about two. Each ruler makes three ornaments, and I found that six was enough to decorate the tree adequately. The rulers were $.50 a piece at Walmart. Just a little tip.... before you cut the ruler, use pliers to remove the metal strip that is along the long edge of the ruler.

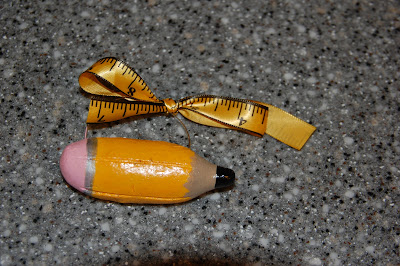
I also made salt dough pencil ornaments to decorate the tree. A great recipe for salt dough ornaments can be found here. It's amazing what salt, flour and water can make!
This recipe was enough for about 10 ornaments. Plus I actually made two cupcake ornaments as well in the batch. So you can get about 12 small ornaments out of the batch. They were fairly easy to make. I just rolled a ball of dough into a log and pinched and rolled the end of it to make a pencil point. I then took a butter knife and made the groves of the pencil and stuck a wire in for hanging. They baked in the oven, came out cooled and then I painted them in about an hour! Easy peasy! :) Before I painted them my husband said: "They don't look like pencils!" I kind of agreed, but I had a vision in my head, and I'm sooo glad that I didn't abandon the craft! I love how they turned out! Very stubby and cute!

I painted them with several coats of acrylic paint and left them to dry. After they were completely dry I rubbed on a stain and then sprayed them with a clear coat of varnish. When they were completely dry (front and back) I tied on a ribbon to complete the look. I just love how they turned out!

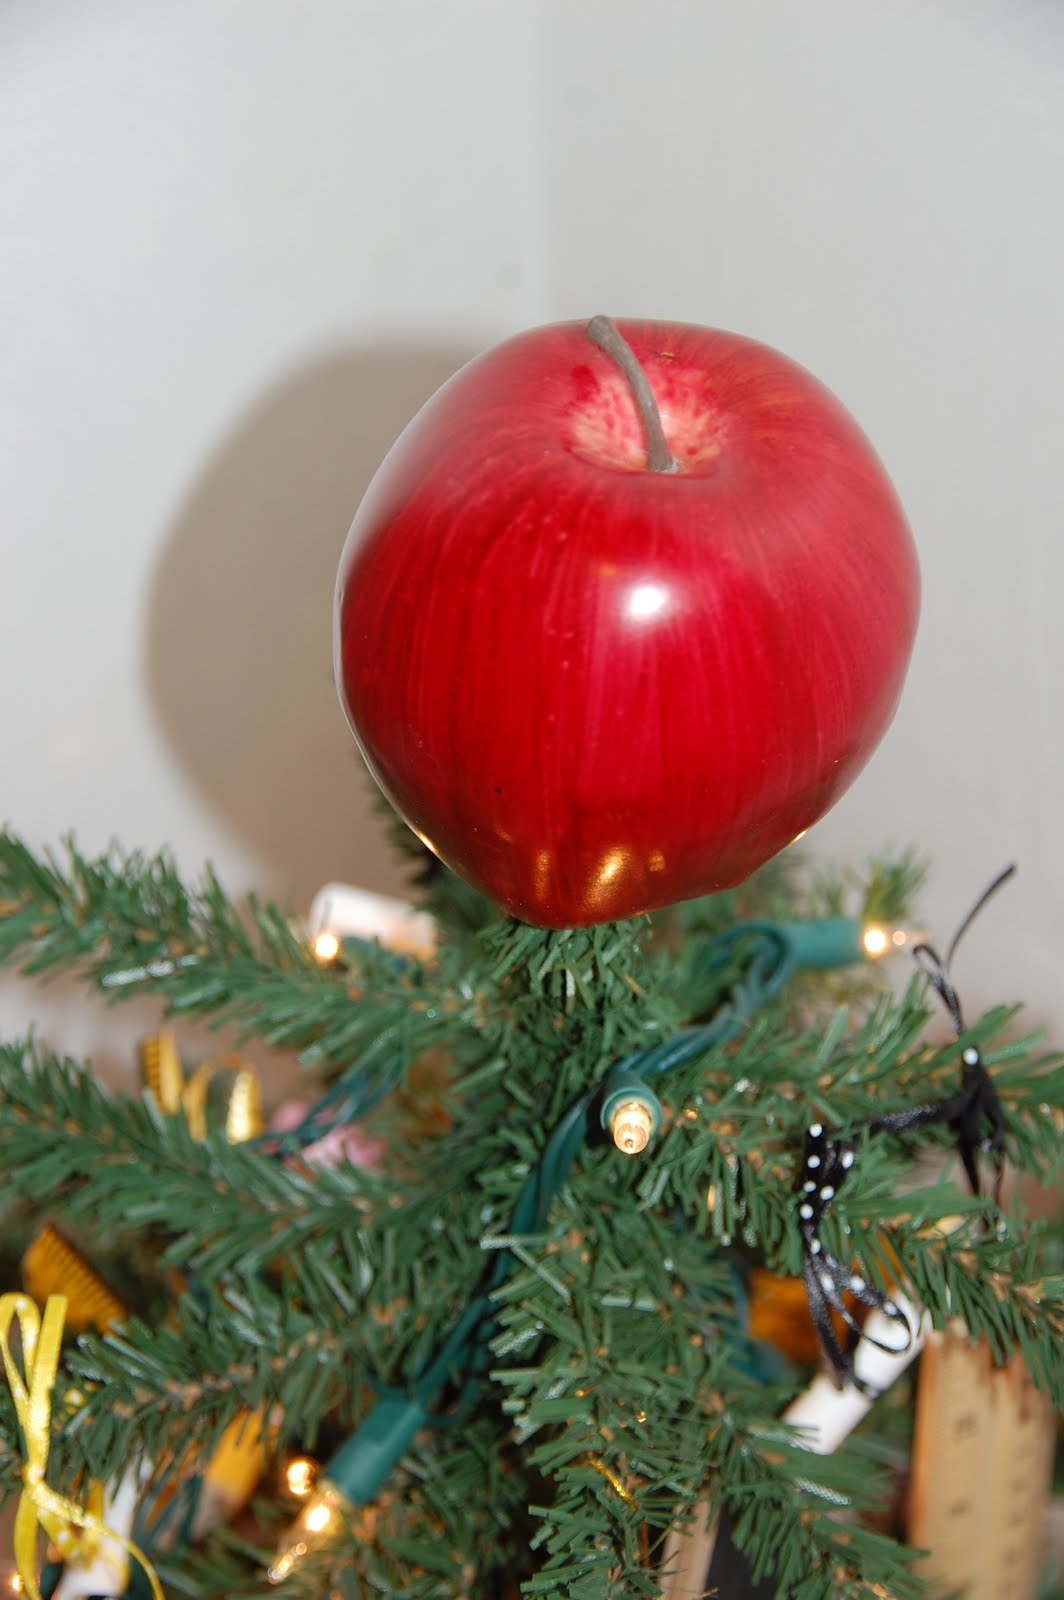
I topped the tree with a faux apple that I got at Joann's, but you could also use the kind from the Dollar Tree. They are cheaper at the Dollar Tree and in my opinion the same quality. To get it to sit on the top of the tree, I hollowed out the apple with a pair of scissors. You could also use a knife, but be very careful. They are usually made of foam, so they are rather easy to hollow out. You don't need to make a very big hole, just keep trying it out and see what fits on your particular tree.
I also used this method with the small faux pumpkins that you can find around Halloween. They make a cute topper for a Fall themed tree!
The little chalkboards that I mentioned came from Joann's craft store. They are very inexpensive and come in a package of three for $1.49. They are 2"x3" in size and you can do soo much with these! I used six on my tree and wrote things like "1 +1=2" and "CAT" and the boy's names. The added bonus is that these are already ornaments and are ready to hang instantly! I love when I can accomplish something quickly!

Like I mentioned above I used a white gel pen to write on the chalk boards. I'm sure if you had one of those cool chalk pens you could probably do the same thing, but wipe it right off instead! I am sooo drooling over those chalk pens, I hope to buy some someday! I have used white acrylic paint in the past on the chalkboards, but it's a lot harder to write nicely with a paint brush! The plus side to using gel pens is that if you mess up you can quickly wipe it off with a damp papertowel!
Here is a look of the chalkboard ornament hanging on the tree.
I also mentioned that I used a box of 12 count white chalk. Yes this is real chalk. It's inexpensive and looks super cute hanging on the tree! A 12 count pack of chalk from Walmart is $.74! I just used ribbon to tie on it and make into an ornament! You could probably cut the chalk in half and get 24 ornaments out of the box, but I found 12 was sufficient enough for my tree. Here is the chalk and ruler ornaments.
Here is a photo of one of my salt dough pencil ornaments.
I put my pencil tree in a basket, covered the base with yellow fleece fabric, and threw in some faux apples to complete the look of my back to school tree! I think it would look super cute filled to the max with apples, but that would be quite expensive since each apple costs $1.00. These apples are from the Dollar Tree. I hope they also come back out with the tiny apple ornaments that they had last Christmas. Those would be a cute addition to the back to school themed tree!

Joann's had a box of mini apples that would have been cute as ornaments, but at $5.00 a box I thought I'll wait until the ones from the Dollar Tree comes out and save them for next year! I suppose that I could have used my 40% off coupon, but I left it at home! :(
And here is a look at the completed "Back to School"themed tree, lit up, and made on a budget! :)
School starts here on August 30th. Stay tuned for my "Back to School" themed dinner that I have planned for Ben! I have a lot of cute ideas!
I am linking up with some cool blog parties. Check out many awesome projects at House of Hepworths, Strut Your Stuff Thursdays at Somewhat Simple, Craft-O-Maniac Mondays, and Skip to My Lou.

Thursday, June 10, 2010

Gnome Garden

I have a gnome obsession! I just love these little old men with pointy hats! They are sooo cute! I have a lot of gnomes. Unfortunately my bigger ones are packed away because they do not go with my current decor. Hopefully next summer I'll landscape with them outside and create something cute!

In the meantime I wanted to create a "Gnome Garden" on a smaller scale. A few months ago, Alex and I picked up a fairy garden kit that was unopened at the thrift store. He had so much fun painting the pot and arranging the little house and stones. We also planted seeds that came with the kit, but unfortunately they never sprouted. So for the last few months I had a decorated planter full of dirt on my kitchen counter! I was so sad, so I decided to make another for outside. And this time I bought real plants for in it! Buying real plants is much more satisfying. You don't have to wait days for your seeds to sprout!

Alex was uninterested this time around, so Ben helped me with the dirt! Here he is making it flat!
Here's a closeup of the sign that I made for the garden. I found this sterling silver spoon for $1 at a local thrift store. I used metal stamps to engrave "Gnome Crossing" into the spoon. I can't wait until the silver tarnishes!
Here is a closeup of one of the many mini gnomes in the garden. He's about 2.5 inches tall.
We even planted some fake carrots that I bought in the miniature section of a craft store! I think they add such a whimsical touch!
Here is a mini fireplace that was a tealight holder. I thought it would add a perfect touch to the gnome garden. I can picture the gnomes and fairies enjoying themselves in front of the fire! I added a flameless tealight so it's safe for the kids to play with.
I planted Irish Moss throughout the garden and used a little mini metal house and white picket fencing that I had in my craft stash.
You are now entering the Gumball Forest! I found this little metal mini gumball machine in the dollhouse miniatures section of a craft store. I thought it was soo cute, and bought it to save for a future project. I wasn't sure what I was going to use it for, so I thought it was perfect for this little gnome garden! A gnome can't be without his gumballs, can he?! And to the left of the gumball machine is a small plant that looks like a tree in a miniature world.
I used those small colored glass pebbles which are also found in craft stores. You can also use aquarium gravel as a path in your garden. That works well too! In our first gnome garden we used green aquarium gravel. It turned out very cute! You can also use small stones from your neighborhood. Use what you already have and have fun with it!
Here is another view of our magical garden! I also added some succulents, which you can see on the right hand side of the garden. I love succulents! They are my favorite plant, and are so easy to care for!
If you had a mini garden, what type of whimsical things would you use for decoration?

Wednesday, June 9, 2010

Last Day of Preschool & Teacher Gift

Today was Ben's last day of Preschool! My little man is growing up way too fast! Here he is with his wonderful teacher Mrs. Spotts! She is the best teacher ever, and I wish I could be five-years-old again so I could be in her class!
I wasn't sure what I wanted to do for a thank you gift, so I came up with this jar. I found several ideas online and just combined them all to come up with this!

I found this medium size jar at Walmart. It is basically sort of square and has a screw on lid. I liked it because it has a line towards the bottom of the jar, and it made it easy to line up my crayons straight!

I made two of these jars. This one is my first attempt. With this first one I used a hot glue gun and glued the crayons to the glass. I don't know if there was some sort of residue on the glass, but a few of my crayons popped off! This was very frustrating, because I didn't want to give a gift that was falling apart. So I used two rubber bands to help keep the crayons in place! I then covered the rubber bands with the ruler printed ribbon to hide them! My second attempt at this project, I skipped the glue and just used the rubber band to hold the crayons on! It also makes it easier so they can reuse the crayons and not have to worry about pulling the glue off of each one.
I found the faux chalkboard at Joanns and used White Uni-ball gel pen to create the "chalk-like" appearance. I was going to use that air-dry white modeling clay to make teeny tiny chalk to glue on the chalkboard, but I couldn't find any at Walmart, and I figured a small detail like that may get overlooked anyhow.

I then added a little tag that said: "Thank you for making me a smartie!" And I filled the jar with smartie candy! A medium jar like this took a bag of 60 smartie candies (which was also found at Walmart). My sister had to locate the candies for me, because I couldn't find any at my two local Walmarts. Oh and it took 57 crayons to cover the jar!
Yummy! Speaking of "smarties" have you seen the giant smarties candy yet? It's probably three times the size of a regular pack! How fun!

Hope you're enjoying your week! Mine has been a busy one!

Monday, April 12, 2010

More Photos from the Retreat

I got back late afternoon yesterday from my retreat! I had such a great time, that I hated leaving, but looked forward to seeing my family! The boys were excited to see me, but Ben was disappointed that I had to miss his first soccer game! I had scheduled this retreat way before he signed up for soccer, so I had no idea at the time that I would miss it!

Here are the other photos that I said I would post. This is the area where we crafted! (Photo by: Ang Valent)
We had two talented ladies in our group who knit and crocheted! This was the room that they hung out in. Isn't it great?! I sat in this room alot with them, it was soo cozy! (Photo by Ang Valent)
On Saturday I took a walk outside and they had this wonderful pond on their property. If you look through the trees you can see the building that we stayed in.
The back side of the building was the entrance to the office and chapel. Look at this beautiful arch that led the way to their back entrance! I love all of the details in this old building!
And I cannot forget about this cute little guy! As I mentioned the other day, there are elderly people who run this Bible College. They take care of the maintenance and cooking. They live in apartments in the upstairs. The one lady has two little pugs that are just adorable! I didn't get a picture of Sassy, but this is Elliot! I just love his sad little eyes!

These were the first pugs that I met, so I don't know if it's the personality of this particular dog or in the breed, but they were very much like a cat! Meaning...you could call them and most dogs will run to you and you can pet them and play with them. These dogs came to you on "their" terms only when "they" wanted...just like a cat! lol
I feel just like this pug looks...sad...I miss the great time I had this weekend! But I'm looking forward to the end of September, because there is another retreat being planned!

Saturday, April 10, 2010

Crafting Retreat

I arrived yesterday at the Biblical Life Institute for my crafting retreat! Isn't this place fabulous?! It's so wooded and serene, I wish I could stay all week! There is a group of elderly people who run this place and they make the most delicious food! They set off the fire alarm to tell you when it's time to eat! lol It scares the crap out of you, especially when you don't know it's coming! I have felt spoiled over the last couple of days!
This place is very old, and it kind of gives me the creeps to be honest. It's beautiful inside, but very very old. We were talking about ghosts last night, and the one lady said that she cannot go down the long hallway upstairs. At the end of the hallway there is a red curtain, and an "A" over the door. She said the curtains move and she just gets this uneasy feeling!

Well as I was going to bed last night around 2:30 am, my friends and I went looking for the red curtain! Well guess where my room is?.....Look at the photo it's room #28 right by the red curtain! LOL

I was soo afraid to go to sleep, that I thought about staying up all night! I did go to sleep, however I woke up about every hour startled looking around the room for ghosts! lol
Here's the sign on the front of my bedroom door. It says: "This is your crafting home away from home. Enjoy!" I thought that was very cute!
Check out my room! I think it is so cute! I love the antique furniture...it's very charming!
The bed was very comfortable, except it squeaked each time I moved an inch! lol
Tomorrow is my last day. I'm going to be very sad to leave! Tomorrow I'll share some photos from around the campus here. This place is just fantastic!

Unfortunately, I have talked more than I have crafted! So hopefully I can get a lot done in the morning!

Sunday, January 24, 2010

POTD: Candy Bouquet

Here is a photo of the "Candy Bouquet" that I had made yesterday for my nephew. He's leaving for basic training tomorrow, and I wanted to make it with a patriotic theme. It was my first one, so it's not the greatest, but I think it turned out cute!

I found some really cute mints with a flag wrapper so I added them in there as well as various red, white, and blue packaged candy. And yes that is "Chewbacca" from Star Wars in the center of the basket with a gun! My nephew is a huge Star Wars fan and when I found a Chewbacca dashboard figurine for the car, I knew it would be perfect!
The basket is a totally cute find from the dollar tree. I just made a bow and hot glued it to the front. I'm making a pink basket here in the next week or so for a friend...can't wait to share that one with you too! Have a great week!